Develop using JetBrains Rider


JetBrains Rider is our recommended IDE for any C# + npm SPA development as it offers a great development UX for both C# and npm projects, including excellent support for TypeScript and popular JavaScript Framework SPA assets like React JSX.

Setup Rider IDE
Rider already understands and provides excellent support npm so you're immediately productive out-of-the-box, the only plugin we'd add is:
 Tailwind CSS Plugin
Which provides provides intelligent support for Tailwind CSS.
Setup C# Solution
To modify both C# and npm TypeScript projects within the same solution, open the C#
/api/ProjectName.sln in Rider, then on the Solution Name right-click on the context menu
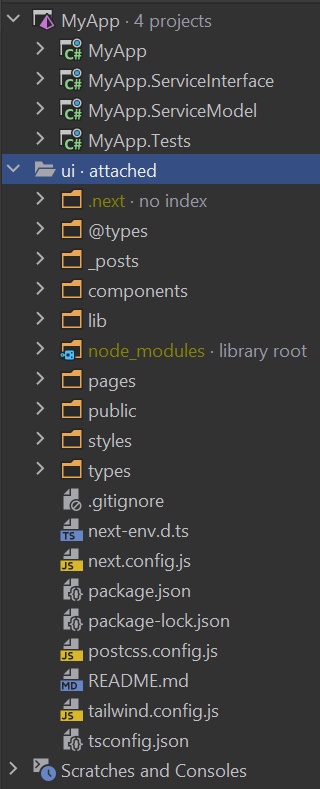
Add > Attach Existing Folder...
Then add the /ui folder which will add your UI folder to the solution as seen on the right:
After this one-time setup you're ready to begin!
Start both npm & C# projects
To take advantage of Next.js's Fast Refresh support, we're now
recommending UI development through its dev server which you can do in rider by opening package.json and running the
dev script:


This launch Next.js in watch mode where any changes to /ui assets will have immediate effect.
Then to start the back-end C# project, right-click on the Host Project and click Run on the projects context menu.
With both projects started you can open and leave a browser tab running at http://localhost:3000
where it will automatically reload itself at every Ctrl+S.
When you're ready to preview a development build of the Client UI in your .NET App, run:
$ npm run build:local
Which will publish your React's App static assets to the .NET App's /wwwroot where it can be previewed from
https://localhost:5001.
Rider's new Task Runner
In the latest version of Rider, once you run the npm and dotnet tasks after the first time, they will appear in Rider's new useful task runner widget where you'll be able to easily, stop and rerun all project tasks:

Start npm & C# projects from the terminal
These GUI tasks are just managing running CLI commands behind-the-scenes, which if you prefer you can use JetBrains
excellent multi-terminal support to run $ dotnet watch and $ npm run dev from separate or split Terminal windows:

Deploying to Production
When you're ready to deploy your App you can create a production build with:
$ npm run publish
Which will generate production builds of your C# projects and npm projects with its static generated UI assets
written to /wwwroot to be deployed together with your complete .NET App.
Our recommendation for the best possible responsive UX is to deploy your App's /wwwwroot static assets to a CDN in
order for the initial load of your App to be downloaded from nearby CDN edge caches.
To do this configure the production url the UI should use for all its /api Ajax requests by modifying
DEPLOY_API in your next.config.ts:
const DEPLOY_API = 'https://$DEPLOY_API'
This template also includes the necessary GitHub Actions to deploy this Apps production static assets to GitHub Pages CDN, for more info, checkout GitHub Actions Deployments.
Get Started
Driven by the static typing benefits of TypeScript, React bundles full Type Definitions with their libraries that development IDEs like Rider take full advantage of that's used to power its type-safe & productive intelli-sense dev UX.
If you're new to React a good place to start is React Getting Started.
